Barry installed the starter motor & front chassis re-enforcement bar. Both went on smoothly.
Installed new Aeroquip stainless steel clutch line. Seems way too long! Sent a message to seller to make sure everything is OK.
RAMFLO air filters arrived today.
Facet electric fuel pump kit arrived on Tuesday. Still waiting for the fuel pressure regulator.
No word on the electric fan. Going to check local shops to see if we can't find a suitable replacement.
Still trying to source "classic" Castrol XL 20W50 oil in Canada. Also need break-in additive.
Wednesday, October 29, 2014
Monday, October 27, 2014

Ditching the mechanical pump
Many Weber carburetor guides recommend using electric fuel pumps. They provide constant pressure (3.5 - 4psi) and give a slight horsepower gain. So I ordered the Facet fuel pump kit from Burton Power:
http://www.burtonpower.com/facet-electric-fuel-pump-kit-silver-top-4-4-5psi-fac476087k.html
and the blanking plate:
http://www.burtonpower.com/fuel-pump-blanking-plate-x-flow-pre-x-flow-essex-fp281a.html
Some good Weber resources:
http://www.webercarbsdirect.com/v/vspfiles/images/Weber%20Trouble%20Shooting%20Guide.pdf
http://www.minimania.com/Tuning_your_DCOE_Style_Carburetor
http://www.summitracing.com/int/search/product-line/haynes-techbook-weber-carburetor-manuals
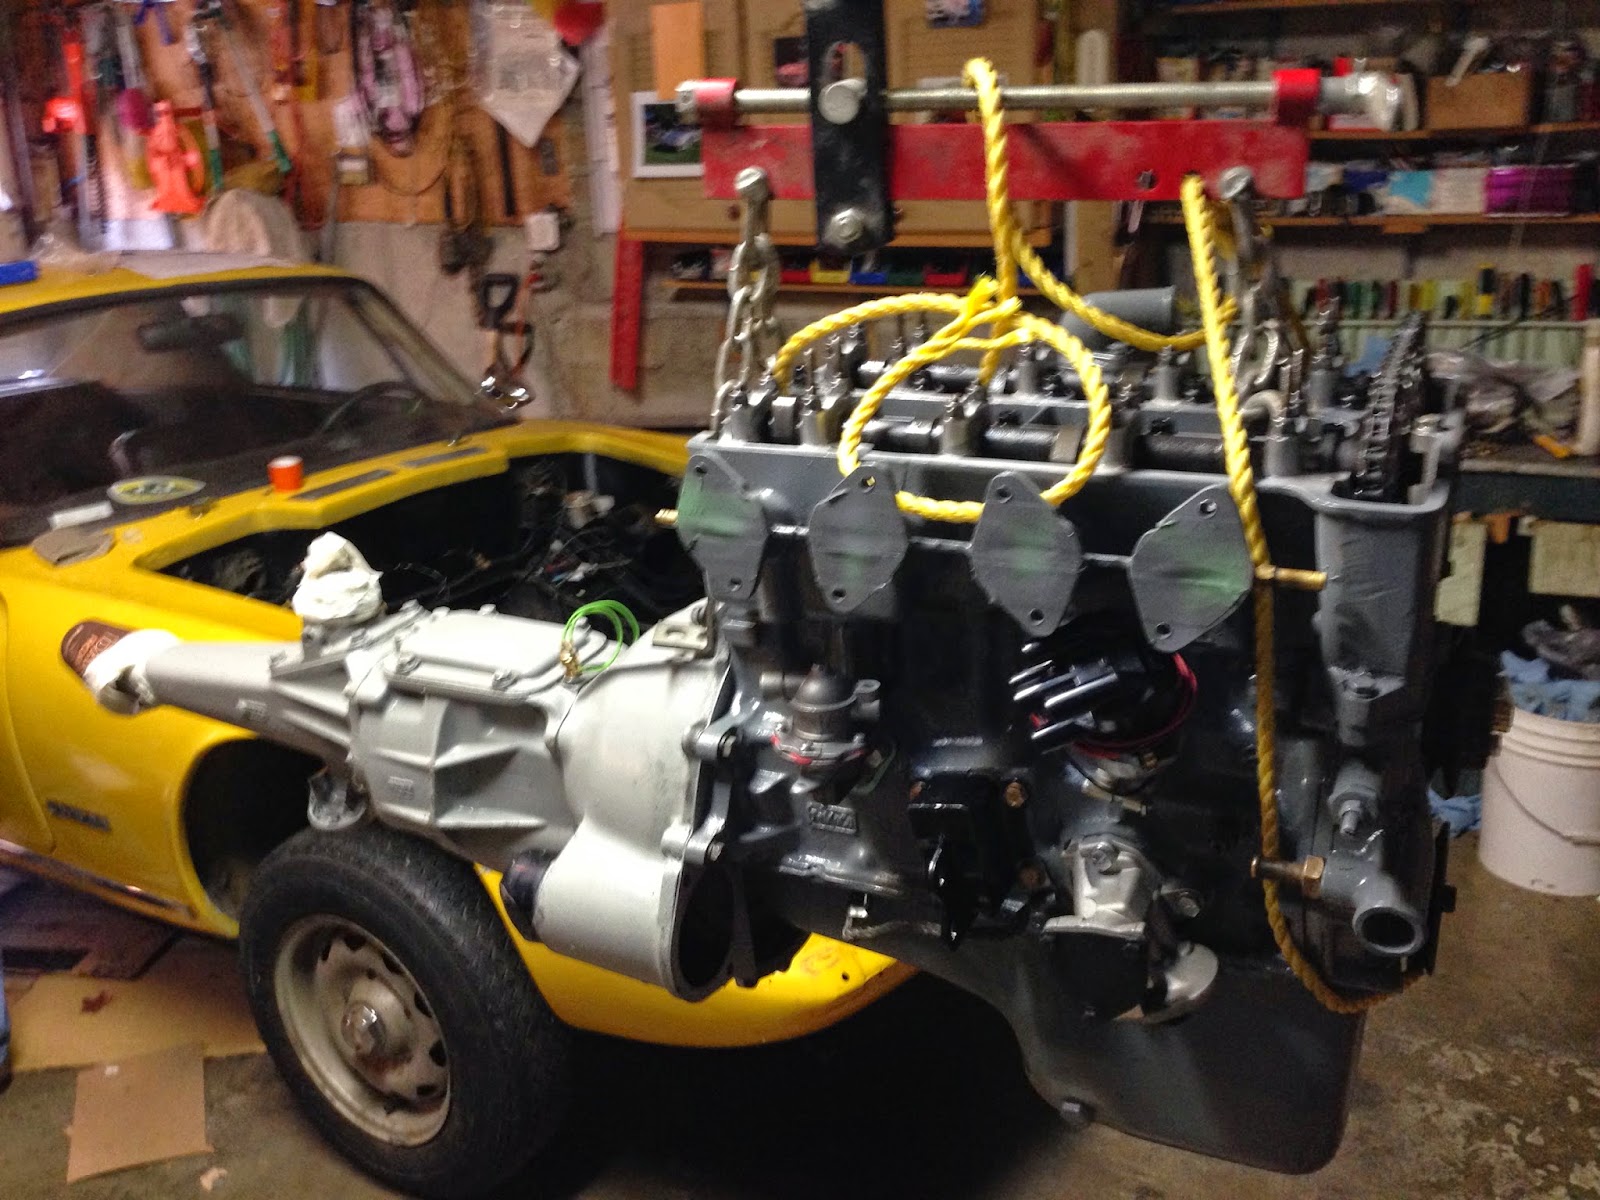
Engine install part 4
Bob (top-left), Martyn (bottom-left) and Barry (right) succeed. It was a frustrating job: two attempts and the better part of a day. The driveshaft fell out on the first try, and after several hours of fiddling, everything went back together.
In pictures:
.jpg)
.jpg)
.jpg)
.jpg)
In pictures:
Engine install part 3
After the previous days fiasco, we decided to install the engine and gearbox separately.
To install the gearbox:
- Remove the passenger seat,
- Remove the driveline tunnel grommet,
- Jack up the front of the car,
- Remove the front passenger-side wheel,
- Slide the transmission under the car (through the wheel arch) and into position,
- Lift/jack the gearbox up and slide it backwards into the transmission tunnel,
- Inside the car, stick your hand in the tunnel and connect the draft shaft,
- Attach the gearbox bracket / mount,
- Support the front of the bell housing (from above or below).
You need to align the gearbox and driveshaft to fit them together. It requires a lot of fettling, and unfortunately, it took us 3 hours.
Engine install part 2
Barry and I spent 8 hours trying to install the engine & gearbox together. Here's why it doesn't work: the bellhousing will not clear the engine mounts; and even if it did, the angle & space required to connect the driveshaft & gearbox doesn't exist. Sorry boys, it can't be done with the body & chassis together.
Sunday, October 26, 2014
Engine install part 1
Cleaned flywheel & pressure plate.
Bolted up gearbox.


Gearbox refresh
The 4-speed gearbox & clutch was in sad shape. The peddle box spring was broken, the master cylinder was full of cheese, the slave cylinder looked beat up and two circlips fell out of the bell-housing when we pulled the engine. Time for a refresh:

- Removed and disassembled the peddle box assembly. Sanded and then painted with POR-15. (See below)
- Made trip to transmission shop, pressed in new front and read oil seals.
- New clutch master & slave cylinders installed.
- New fork boot installed.
- New fork & release bearing clips installed.
- New throw-out bearing installed.
Friday, October 17, 2014
Engine done, adjusting twin cam valve timing & DIY zinc plating
Engine is done. Assembled by Van Holst Automotive in Kitchener.
Ordered two RAMFLO air filters. Should give us some extra room in the engine bay.
Good article on setting valve timing:
http://elantrikbits.com/lotus-elan-blog/adjusting-twin-cam-valve-clearances/
And Eastwoods Media Tumbler & DIY zinc plating system to make your nuts & bolts looks spiffy:
http://www.eastwood.com/eastwood-18-lb-tumbler.html
http://www.mustangandfords.com/parts/1310-eastwood-tin-zinc-electroplating-system/?__federated=1
Friday, October 10, 2014
Engine machine work done
Thanks Twin City. Solid advice, attention to detail, exemplary internal balancing job. Located in Kitchener, Ontario. (519) 745-6196
Thursday, October 9, 2014
Notes from the original owner
- Was Barry's classmate in grade 5!
- He first saw the car driving around downtown Toronto (circa mid-1970)
- Noticed the same car advertised in the newspaper the following day
- Purchased the car the next day (Coventry Motors?), used his BWM 1800 as a trade in
- Car was the dealer demo and had 11,000 miles on it
- Owned the car 11 years, occasional use only, dry storage in the winter
- Purchased a service manual and did all the servicing himself
- Spent several weeks converting the car from positive to negative ground (after connecting the battery the wrong way and burning out the wiring system)
- The car had one small accident - a lady clipped the driver side door in Paris, Ontario
- Traded the car in on a Volvo in the early 80's
Wednesday, October 8, 2014
Transmission seals done & front suspension inspection
New front & rear oil seals installed in the transmission.
News from machine shop. Crank, rods and pistons have been balanced. Waiting for new thrust washers.
Barry added black accents and polished cam cover. See below.
Front anti-roll bar needs new bushings. Ball joints are shot as well.

News from machine shop. Crank, rods and pistons have been balanced. Waiting for new thrust washers.
Barry added black accents and polished cam cover. See below.
Front anti-roll bar needs new bushings. Ball joints are shot as well.
Saturday, October 4, 2014
Soda-blasting and painting valve cover and oil pan
Finally - a proper day working on the car!
Barry cleaned and repainted the front anti-roll bar.


I soda-blasted the engine pulley, valve cover and lipseal pan. The process is a little messy, but it gently removes oil and paint. See attached pictures.
Barry cleaned and repainted the front anti-roll bar.
Then a welcome surprise - the original owner of the car dropped by... had a good chat for a couple of hours. More on this later.
Went hunting for engine paint. Found a perfect match for the sump - "Dark Grey" at NAPA Auto Parts. And "Wrinkle Red" (Canadian Tire) for the valve cover. Did final sanding & cleaning - then repainted.
Went hunting for engine paint. Found a perfect match for the sump - "Dark Grey" at NAPA Auto Parts. And "Wrinkle Red" (Canadian Tire) for the valve cover. Did final sanding & cleaning - then repainted.
We hope Twin City machine shop will finish the engine block on Monday.
New goodies in the mail, front bumper reinstalled
Stainless steel header and idler sprocket arrived.
The Dave Bean header looks fantastic. It's a two piece, 4-2-1 configuration, flowing into a 2 1/4" (wide bore) pipe. When you compare it to the original 4-1 OEM header, the new one should help the engine flow much better!
Barry reinstalled front bumper & painted transmission.
Twin City called to say the head is done.
Subscribe to:
Comments (Atom)