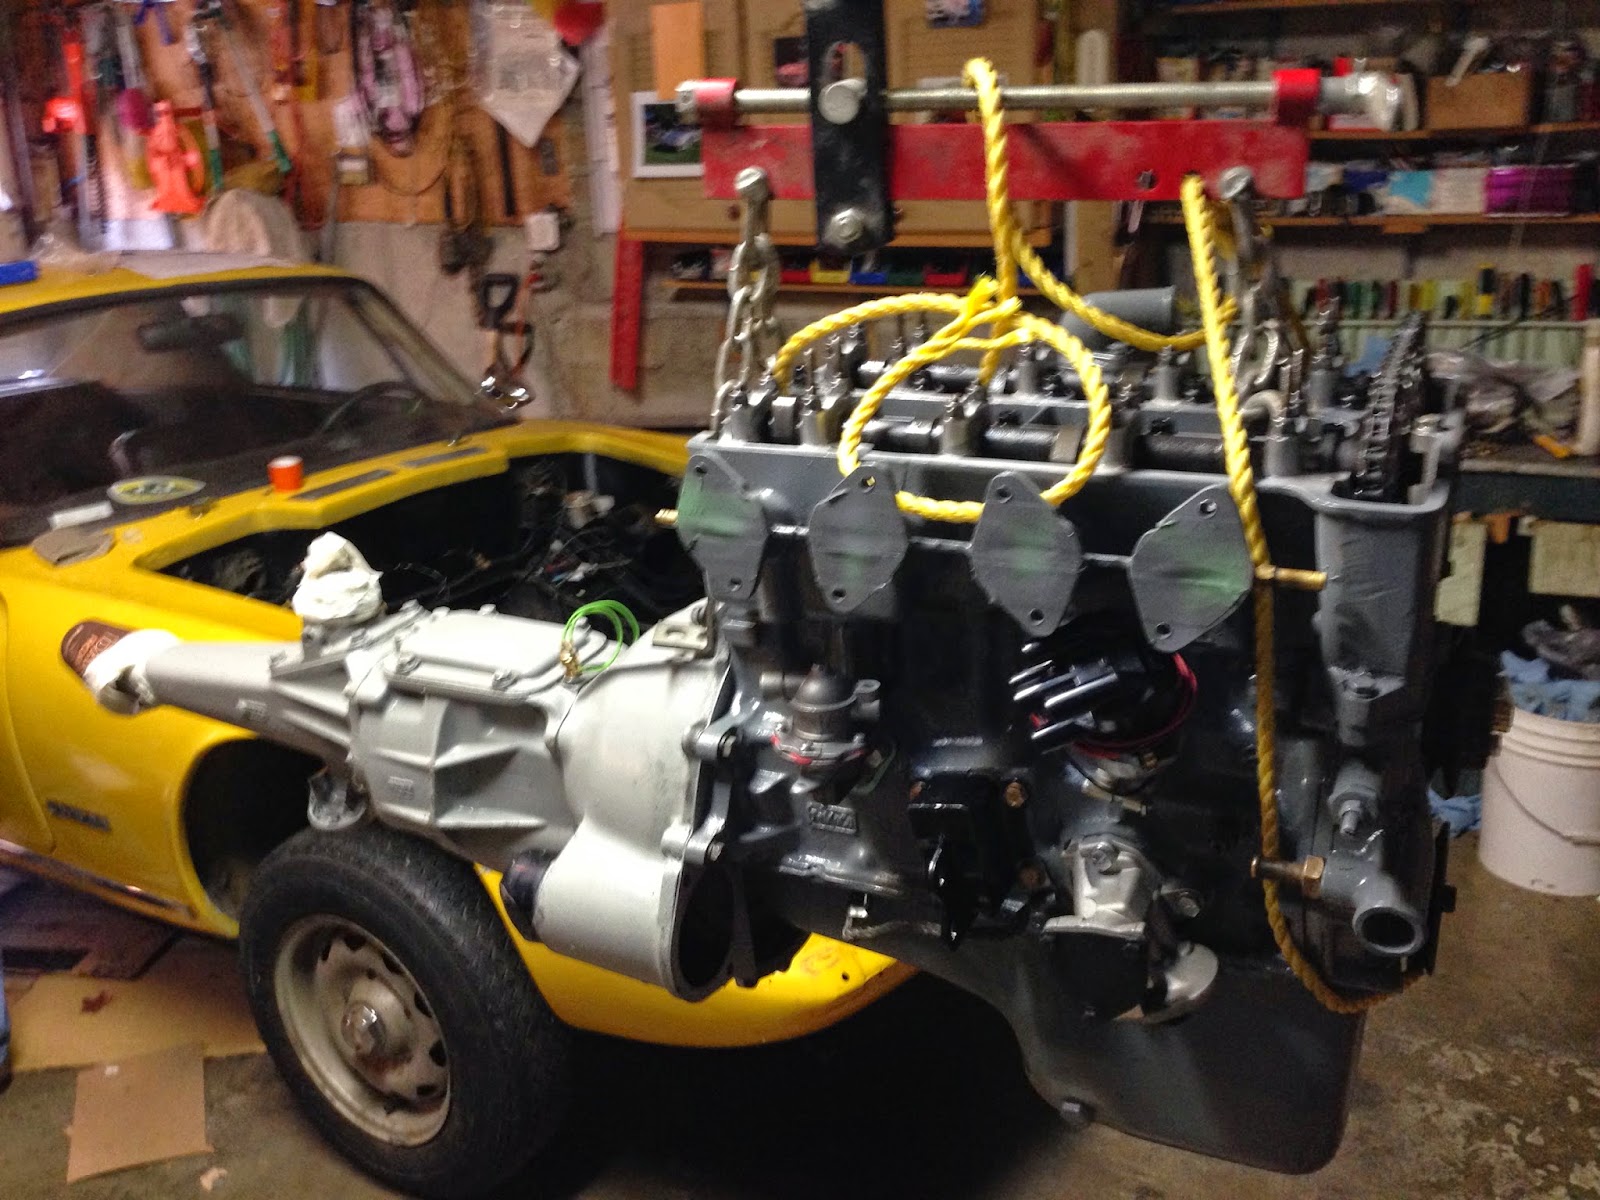
Saturday, December 20, 2014

Making plans for the spring

Starter motor
  • Hi-perf gear-reduction starter (sourced from RD Enterprises).

Electronic ignition
  • Pertronix Ignitor / Flamethrower III (ordered from Amazon).

Body
  • Stainless steel sill members (on order from SJS in the UK)

Muffler
  • A 6" 316 S/S silencer (SJS)

Front/rear suspension
  • TTR fronts & Koni rears (Tony Thompson Racing)
  • New rear 'a' frames (on order from SJS)
  • New rubber bushings (front/rear suspension and anti-roll bar)

Wheels
  • Sandblast and repaint / powder coat rims (calling around for quotes)
  • New tires (Bridgestone Potenzas or Toyo)

Re-jet carbs
  • Balance and re-jet carbs (for 1615cc)

Misc
  • New black/silver Lotus emblem
  • Breather / oil catch can
  • 25 amp fuse for fan
  • Radiator fluid catch can

Saturday, December 6, 2014

Sounds of the Lotus Twin Cam

After a lot of frustration and trouble-shooting, Harv Van Holst found the Pertronix electronic ignition was faulty. He re-installed the original distributor & coil and got the car running. 

Here's a short video from this morning:


Tuesday, December 2, 2014

Short lived celebration

After running for 5 minutes, the Lotus refused to start again. It became a guessing game: battery, electrical fault, timing, fuel lines, bad carburetor or the electronic ignition. Everything looked good, but the car continued to tease us.

Thursday, November 20, 2014

Starting the engine part 3

I received a parcel from Burton Power: new air rams, fiber gaskets and rubber o-rings for the carburetors.

Bob and Barry ran through the items Pertronix asked us to check. The voltage on the positive terminal of the coil was < 9V when the engine was turning over. The only solution was to replace the new battery with another one.

On the first turn of the key, the engine spluttered and then erupted into a healthy note. The car was finally running!


Starting the engine part 2

After several attempts, the engine would not fire. Barry started checking the plugs and found there was no spark. This was odd because the electrical system seemed to be in top form and we had a new Petronix electronic ignition system installed.

Bob dropped in and checked the ignition coil, wires and electronic distributor. He found the electronic ignition module was not delivering a pulse to the coil.

I called Pertronix technical support and they made two suggestions: the engine not grounded properly (fresh engine paint?), or the ignition module was not receiving enough voltage (9V+ required).

Tuesday, November 18, 2014

Starting the engine part 1

After 28+ years, it was time to start the engine. We began by filling the gas tank with Shell Supreme and lead/octane booster.

Next, we removed the spark plugs and primed the engine by turning it over for about a minute. Everything sounded good, but gas was leaking from one of Weber fuel connections.

The fuel leak was caused by a failed 'fiber' gasket. We called the local parts & motorcycle shops and found no one stocks these bits anymore. As a temporary fix, we swapped it for a copper washer and hoped the leak would be be minimal.

There was more drama when I pulled on the choke and the knob came off in my hand. The cable had snapped somewhere behind the dash. This falls into the 'pain in the ass' category of automotive problems, but is not a show stopper.

We remained optimistic the engine would run and decided to go for it. I jumped in the car, turned the key and waited for the mystical sound of the Lotus Twin Cam. It merrily turned over until gas started pouring out the carbs.

Our first attempt to start the car was over. I made a list of replacement parts and grabbed my credit card...

Sunday, November 9, 2014

Adding fluids and fixing the leaks

Getting close to starting the engine. Final steps include adding coolant, gearbox & engine oil. We had a couple of leaks to fix along the way.

The first leak was from the temperature sensor. After a lot of fettling, we found a small rubber o-ring that fits inside the outer brass nut.

And of course, the valve cover leaked. This was a bitter pill to swallow because I order the "uprated" gasket and silicone sealer. Both products failed around the rear "half-moons" and head bolt. I pulled the cover and resealed everything with Black Permatex.

I also took the opportunity to install the hard-to-find-and-expensive "Jim Clark" Lotus horn button.


Electric fuel pump installed

I installed the Facet (http://www.burtonpower.com/facet-electric-fuel-pump-kit-silver-top-4-4-5psi-fac476087k.html) electric fuel pump, fuel regulator (http://www.rallynuts.com/motorsport-fuel-filter-regulators/sytec-pro-flow-fuel-regulators.html) and rubber fuel lines.

A word of caution: the pump comes filled with light-weight machine oil - and it's easy to spill!


Electric fan installed

The original owner reported the car always ran "hot", so we've tried to address the problem during the rebuild. We had the radiator re-cored (now thicker & denser) and changed to an electric "pusher" fan.

The electric fan gives us a few benefits: better airflow, more horsepower, and it can continue cooling after the car is shut off.

A friend recommended "Spal" fans, so I purchased one (Spal 30102058 10" Paddle Blade Pusher Fan) from Mueller Motorwerks. This fan is rated at 1100 cfm, has balanced blades and fits in the cramped space!

It arrived this week and Barry & Bob installed and wired it.


Tuesday, November 4, 2014

Using diesel engine oil in your Elan

Interesting discussion about using "new" Shell Rotella T 15W40 oil in your classic car engine:

http://forums.pelicanparts.com/porsche-911-technical-forum/336535-should-we-all-using-diesel-engine-oil.html

and

Comp Cams recommends using diesel engine oil.

http://www.compcams.com/information/whatsnew/NewsDetails.asp?ListHistoryID=1821071676

"Simply put, today’s engine oil is just not the same as it used to be, thanks to ever tightening environmental regulations. The EPA has done a great job in reducing emissions and the effects of some of the ingredients found in traditional oils; however these changes to the oil have only made life tougher on your camshaft. The lubricity of the oil and specifically the reduction of important additives such as zinc and manganese, which help break-in and overall camshaft life, have been drastically reduced. In terms of oil selection, we recommend Shell Rotella T oil for the break-in procedure. Most often used in diesel engine applications, this higher lubricity oil works in gasoline engines as well.”

Wednesday, October 29, 2014

Odds and ends

Barry installed the starter motor & front chassis re-enforcement bar. Both went on smoothly.

Installed new Aeroquip stainless steel clutch line. Seems way too long! Sent a message to seller to make sure everything is OK.

RAMFLO air filters arrived today.

Facet electric fuel pump kit arrived on Tuesday. Still waiting for the fuel pressure regulator.

No word on the electric fan. Going to check local shops to see if we can't find a suitable replacement.

Still trying to source "classic" Castrol XL 20W50 oil in Canada. Also need break-in additive.

Monday, October 27, 2014

Header installed


Ditching the mechanical pump

Many Weber carburetor guides recommend using electric fuel pumps. They provide constant pressure (3.5 - 4psi) and give a slight horsepower gain. So I ordered the Facet fuel pump kit from Burton Power:

http://www.burtonpower.com/facet-electric-fuel-pump-kit-silver-top-4-4-5psi-fac476087k.html

and the blanking plate:

http://www.burtonpower.com/fuel-pump-blanking-plate-x-flow-pre-x-flow-essex-fp281a.html

Some good Weber resources:

http://www.webercarbsdirect.com/v/vspfiles/images/Weber%20Trouble%20Shooting%20Guide.pdf

http://www.minimania.com/Tuning_your_DCOE_Style_Carburetor

http://www.summitracing.com/int/search/product-line/haynes-techbook-weber-carburetor-manuals

Engine install part 4

Bob (top-left), Martyn (bottom-left) and Barry (right) succeed. It was a frustrating job: two attempts and the better part of a day. The driveshaft fell out on the first try, and after several hours of fiddling, everything went back together.

In pictures:


Engine install part 3

After the previous days fiasco, we decided to install the engine and gearbox separately.

To install the gearbox:
  • Remove the passenger seat,
  • Remove the driveline tunnel grommet,
  • Jack up the front of the car,
  • Remove the front passenger-side wheel,
  • Slide the transmission under the car (through the wheel arch) and into position,
  • Lift/jack the gearbox up and slide it backwards into the transmission tunnel,
  • Inside the car, stick your hand in the tunnel and connect the draft shaft,
  • Attach the gearbox bracket / mount,
  • Support the front of the bell housing (from above or below).
You need to align the gearbox and driveshaft to fit them together. It requires a lot of fettling, and unfortunately, it took us 3 hours.

Engine install part 2

Barry and I spent 8 hours trying to install the engine & gearbox together. Here's why it doesn't work: the bellhousing will not clear the engine mounts; and even if it did, the angle & space required to connect the driveshaft & gearbox doesn't exist. Sorry boys, it can't be done with the body & chassis together.

Sunday, October 26, 2014

Engine install part 1

Cleaned flywheel & pressure plate.

Installed AP Racing Stage 1 clutch - went on easy with alignment tool. Bolted on pressure plate. There's a longer and somewhat unbelievable story here --- will blog about later.

Bolted up gearbox.


Gearbox refresh

The 4-speed gearbox & clutch was in sad shape. The peddle box spring was broken, the master cylinder was full of cheese,  the slave cylinder looked beat up and two circlips fell out of the bell-housing when we pulled the engine. Time for a refresh:
  • Removed and disassembled the peddle box assembly. Sanded and then painted with POR-15. (See below)
  • Made trip to transmission shop, pressed in new front and read oil seals. 
  • New clutch master & slave cylinders installed.
  • New fork boot installed.
  • New fork & release bearing clips installed.
  • New throw-out bearing installed.


Friday, October 17, 2014

Engine done, adjusting twin cam valve timing & DIY zinc plating

Engine is done. Assembled by Van Holst Automotive in Kitchener.

Ordered two RAMFLO air filters. Should give us some extra room in the engine bay.

Good article on setting valve timing:

http://elantrikbits.com/lotus-elan-blog/adjusting-twin-cam-valve-clearances/

And Eastwoods Media Tumbler & DIY zinc plating system to make your nuts & bolts looks spiffy:

http://www.eastwood.com/eastwood-18-lb-tumbler.html

http://www.mustangandfords.com/parts/1310-eastwood-tin-zinc-electroplating-system/?__federated=1


Friday, October 10, 2014

Engine machine work done

Thanks Twin City. Solid advice, attention to detail, exemplary internal balancing job. Located in Kitchener, Ontario. (519) 745-6196

Thursday, October 9, 2014

Notes from the original owner

  • Was Barry's classmate in grade 5!
  • He first saw the car driving around downtown Toronto (circa mid-1970)
  • Noticed the same car advertised in the newspaper the following day
  • Purchased the car the next day (Coventry Motors?), used his BWM 1800 as a trade in
  • Car was the dealer demo and had 11,000 miles on it
  • Owned the car 11 years, occasional use only, dry storage in the winter
  • Purchased a service manual and did all the servicing himself
  • Spent several weeks converting the car from positive to negative ground (after connecting the battery the wrong way and burning out the wiring system)
  • The car had one small accident - a lady clipped the driver side door in Paris, Ontario
  • Traded the car in on a Volvo in the early 80's


Wednesday, October 8, 2014

Transmission seals done & front suspension inspection

New front & rear oil seals installed in the transmission.

News from machine shop. Crank, rods and pistons have been balanced. Waiting for new thrust washers.

Barry added black accents and polished cam cover. See below.

Front anti-roll bar needs new bushings. Ball joints are shot as well.


Saturday, October 4, 2014

Soda-blasting and painting valve cover and oil pan

Finally - a proper day working on the car!

I soda-blasted the engine pulley, valve cover and lipseal pan. The process is a little messy, but it gently removes oil and paint. See attached pictures.

Barry cleaned and repainted the front anti-roll bar.

Then a welcome surprise - the original owner of the car dropped by... had a good chat for a couple of hours. More on this later.

Went hunting for engine paint. Found a perfect match for the sump - "Dark Grey" at NAPA Auto Parts. And "Wrinkle Red" (Canadian Tire) for the valve cover. Did final sanding & cleaning - then repainted.

We hope Twin City machine shop will finish the engine block on Monday.


New goodies in the mail, front bumper reinstalled

Stainless steel header and idler sprocket arrived.

The Dave Bean header looks fantastic. It's a two piece, 4-2-1 configuration, flowing into a 2 1/4" (wide bore) pipe. When you compare it to the original 4-1 OEM header, the new one should help the engine flow much better!

Barry reinstalled front bumper & painted transmission.

Twin City called to say the head is done.

Wednesday, September 24, 2014

Engine rebuild underway & color research

Engine rebuild underway (@ Twin City machine shop).

Some research notes...


Replacing sills. Found a good write-up @ http://elanplus2.webs.com/repairsandupgrades.htm


Engine color: "The closest is a Massey Ferguson Stoneleigh Grey enamel, to which you need to add a little blue enamel, all according to Miles Wilkins." O "Gray enamel."


Valve color is 
"Crinkle red."


Update 1: Chevy Red is very close to the original Crinkle Red.
Update 2: "New Ford Gray" is a good match for the original long block color. 

Tuesday, September 23, 2014

"It's in the mail"

Ken at Dave Bean Engineering emailed to say that the header and idler tensioner sprocket have shipped!

You may remember the indicator stalk was broken & glued back together. It was giving Bob a lot of trouble, and it was beyond saving. So I went on a mission to find a replacement.

I found Land Rover still uses the Lucas 119 stalk in the Discovery (?). In North America, it's a $200 part, in the UK it's a $25 part. So guess what? I ordered one from the UK.

The very next day, I found a used Cortina MK2 indicator stalk on eBay. This is the very same model used in the Elan. I snapped it up.

Both arrived without drama. And, of course, neither one of them had the correct (bullet) connectors.

Bob took both units apart and examined them. The Land Rover stalk has some major improvements (inside and out) so we decided to go with it. He clipped the ends off, added the bullet connectors, and put everything back together. It's a very nice upgrade and works perfectly.

New chrome for the bumper and wheel nuts

New bumper is back - new chrome looks great!

Thinking about getting the knock-offs done...


Thursday, September 18, 2014

New camshafts arrive, new pump in, looking for new interior trim

Slow going --- waiting for parts.

Camshafts and new tappets arrived from Burton Power in the UK. So engine rebuild can continue.

Barry has taken the front bumper in for re-chroming; and had a new water pump pressed into the front housing.

I've started making inquiries about the interior components (roof liner, dash, carpets, etc.).

Tuesday, September 9, 2014

Ordering engine parts from the UK

Cancelled old camshaft order. Re-ordered Fast Road Camshafts (280 duration & 380 lift) from Burton Power. Hope these arrive next week.

Sunday, September 7, 2014

New pistons arrive & improving the radiator

Been slow going. Family & work committments.

Also waiting for engine & misc. parts to arrive. The biggest hold-up is the camshafts. I ordered Lotus "Sprint" spec. cams because they provide the best low-end torque / power. Most shops are offering auto-cross & full race cams...

But the Cosworth pistons are here and they look great. Much lighter & slightly higher compression.

Barry picked up the radiator. Added extra row, higher density core and added thermostat to run a push fan. Should keep the new motor nice and cool.

Thursday, August 21, 2014

Upgrading the exhaust system

We're upgrading the car with a stainless steel header and 2" exhaust system.

First problem: the car uses the early-type transverse muffler. No one stocks or manufactures these anymore (UK or North America), which means we need to have one fabricated. Barry worked his magic and had one made today!

The car should sound great!

Ordering engine parts

New engine internals (Cosworth pistons, bearings, valves, springs, sprockets, etc.) ordered from Dave Bean Engineering. Goal is to build a "stage 1" engine - roughly ~140hp.

Sunday, August 17, 2014

New starter solenoid & lots of cleaning

Replaced starter solenoid with new unit.

Scrubbed & cleaned horn for 2 hrs. Had lots of overspray on it, now gone - looks much better!

Removed steering u-joint. New ball-bearing unit in.

Removed steering rack brackets. Cleaned & painted with POR-15.

Respraying the engine bay

At some point, someone did a DIY paint job on the car and did cover/tape off the engine bay. So there is yellow paint on all the wires & components. The "black edge" of the engine bay also looks horrible.

Spent a lot of time taping everything off and respraying the back of the bay...

Engine tear-down progress

Block has been sonically tested. Overbore to 83.5mm should be good.

Ordered new clutch & transmission parts from RD Enterprises.

Looking for new exhaust system. First problem is the car has a early-type transverse muffler. These are not even available in the UK. Will have to have something manufactured.

Head & crank tested

Good news on the engine. Head & crank are in excellent shape. Block has been over-bored; needs sonic testing to see if there is enough "meat" on it to go to 1600ccs.

Friday, August 8, 2014

Car appraised & "hard to find" black Lotus horn button arrives

Waiting on the machine shop.

Had the car appraised for vehicle registration & insurance.

Genuine black & silver horn button arrives.

Barry has taken rad into the shop to be re-cored; will also add thermostat/fan switch. Should improve efficiency and stick with the goal of keeping the car original.

Wednesday, August 6, 2014

Cooling system ideas & new parts arrive

Researching radiators - the +2 uses a wide Triumph Spitfire model, with the top inlet rotated 180 degs. Aluminum would be nice, but having difficulty finding someone who will do the modifications. A thicker (3 row) or denser core would be best. Also looking for thermostat (installed) to drive a fan.

Another package from RD Enterprises arrives (thanks Ray!). New steering u-joint, standard oil pump,  filter and other odds and ends.

Moroso Breather Tank arrives from Amazon. Wrong model (wanted 1 port, not 2 port!) - but will work.

Monday, August 4, 2014

Some eBay wins

Found two gold nuggets. An original black (Jim Clark) horn button on buy-sell forum and an original indicator stalk (to replace the broken one).

Everyone needs a bit of a rest. Engine should be "on the line" this week.

Removing the gearbox

Pulled gearbox - used rolling jacks to pull forward, hooked up to hoist, jacked car up, lowered & pulled out from under passenger side wheel. Remember to disconnect the stick inside the car!

Removed & discarded old muffler. Was in decent shape, but we had to cut it to pull the engine.

Started cleaning the engine bay and gearbox. Years of oil and grime. I would describe it as character building.


Lots of cleaning

Barry painted engine bay flat black. Car had very bad paint job at some point, and there are runs, etc. Not possible to clean up with body still on chassis - this is about as good as it gets - purists & concours snobs might object, most enthusiasts will not notice.

New alternator arrives & broken indicator stalk

New alternator (NipponDenso A14684) has arrived. Will need custom bracket, but lighter weight and higher output (55 amps) than old. Internal regulator lets us discard the existing (antique) unit.

Barry has taken the head to the machine shop and is stripping the block. Machine shop thinks the head has been skimmed before. It also looks like it has been ported and polished. Will know more when they get a chance to inspect next week.

Block & crank look good - probably just rings that have worn out. Hope to identify as 'L' block, and bore out to 1650ccs.

Bob discovers indicator stalk has been glued together. Works erratically. Sourced Land Rover series III unit from UK. Original is from a Ford Cortina MkII - hard to find.

Monday, July 28, 2014

Engine out

Pulled engine with help from Martyn. Started disassembling head.

Lots of discussion about who will do the engine rebuild. Drove around to meet a few shops. What a gong-show.

TIP: If you own a small "engine builder" shop, and you want business - don't get drunk or high at 11am on a Saturday morning and meet with potential customers.

Steering column bushings are shot. With the engine out, should be easy to access.

Getting ready to pull the engine

Cut the exhaust manifold, remove transmission bolts, get pulley into place. Lots of stubborn bolts and hoses. Worked late into the night.

Found transmission is leaking a lot of oil.

Stripping engine & installing new fuse box

Barry begins stripping the engine. Carbs off. Getting ready to pull.

Bob continues with wiring. Installs a new (modern) fuse box. Looking good.


Ordered a new alternator

Sourced new alternator with internal voltage regulator (A14684 Nippondenso 12 Volt 55 Amp) for Bob. In North America, these are used in the 1.3L Suzuki Swift. Clean power from the source, replaces old/heavier GM alternator and external voltage regulator.

NOTE: This is the same manufacturer Jay Leno used for his Elan 26R build. For some reason he went with the 80 Amp model, which is overkill.

Barry pulled the brake servo. Contained about 1/4 pint of brake fluid. Will need a rebuild.


Wednesday, July 23, 2014

Peddle box out & rear brakes cleaned

Barry was busy:
  • Disassembled front brakes. Cleaned. Need new pads.
  • Took off brake booster.
  • Started removing pedal box.
Making plans for:
  • Pulling engine

Tuesday, July 22, 2014

Looking for a machine shop with Twink experience

Calling around to machine shops & engine builders for quotes on the twink.

First package from R.D. Enterprises in PA arrives. Lots of electrical and brake / clutch parts to replace.

It's time for an engine rebuild

Short break.

Bob will be back next week.

Bad news on the engine. It is free, but it looks worn out. There is oil around the blow by and down the side of the block, indicating worn out rings. The anti-freeze looked cheesy, and the water pump gasket is probably bad. It's time for a rebuild.

Barry disassembled, cleaned and inspected the rear brakes. Looks good.

Wednesday, July 16, 2014

Radiator drained & pulled out

Barry pulled the radiator. Taking to the shop for pressure testing / recore.

Ordered many parts from Ray @ R.D. Engineering in PA.

First goal is to get the car wired & running.

Reverse light saga

Bob installs new reverse light switch in the dash, reverse lights working.

Barry assesses more of the mechanicals. Puts the car on stands so it can be worked on. Is turning the motor over each day.

There is an ongoing discussion about the radiator. The cooling system in the Elans was problematic, and I would like to go with an aluminum radiator & swirl pot. I've called local radiator shops, and there's not much interest or help. Ordering from UK is going to be expensive. Current plan is to recore the rad.


Going through the electrical system

Wiring in very good condition.

Bob & Barry disassemble the wiper motors and electric windows. Clean & lube is all they need. Back in the car. Working.

Turn signals working.

No reverse lights. Looking for connections, which should be on the right-side transmission bellhousing, but none found. There is a switch on the dash - not working.

Barry siphoned off remaining gas, removed float and examined. Cleaned. Reassembled. Line looks good.